/image%2F0703241%2F20140120%2Fob_b8b3b5_blog-header-new2.jpg "nail art - reviews - swatches - nail tutorials")
Hello lovelies,
Earlier, I have shared with some of you that I have been lately in a creative slump. I haven't felt inspired, I didn't feel like doing any nail art not even anything overly festive. Few days ago it changed - I got contacted by minted.com inviting me to check out their site. I've noticed they have an art marketplace section with different art prints. I came across so many inspiring artworks and I finally felt that familiar urge to paint! Today's nails are inspired by a Dazzle Berry Art print. I didn't copy it exactly, but I took the idea and modified it for nails. I also wanted to use more natural colours even though I absolutely love the colours the artist used.


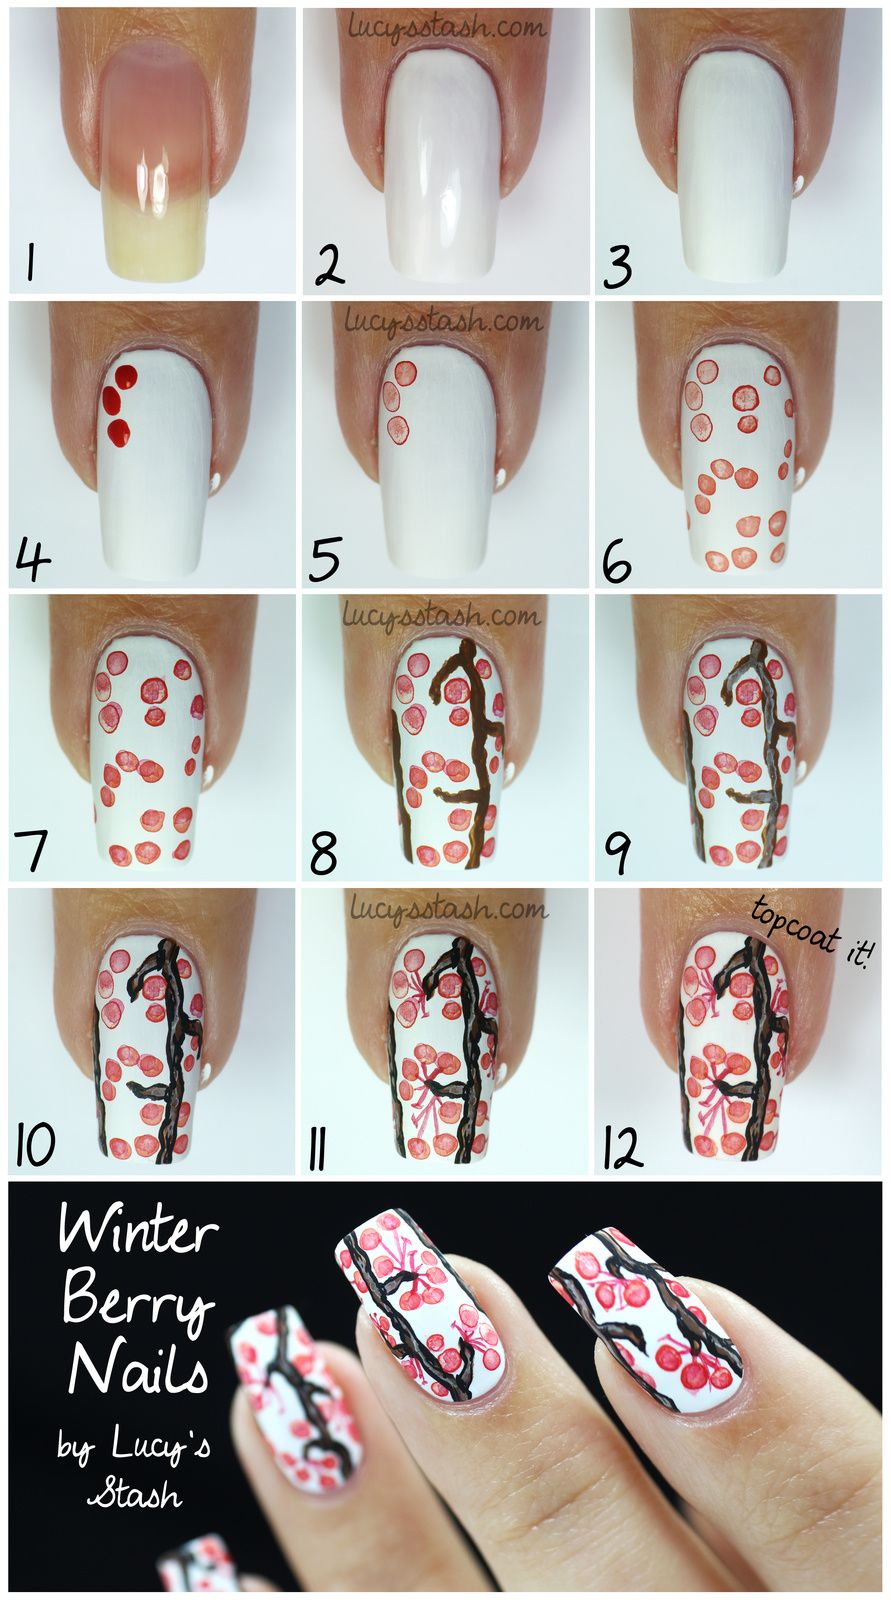
I've taken pictures to create a tutorial for you as well. Here's how to do it:
- Apply base coat
- Apply two coats of white nail polish. I have used OPI Alpine Snow
- Paint the nails with a thin coat of white acrylic paint
- Thin down red acrylic paint with water and put droplets on the nail using brush. Pat the brush on a paper towel to get rid of the excess water in the brush
- Use the brush to soak in the droplets on the nails. It should leave coloured outline or dots depending on how long you wait. you don't have to wait longer than few seconds
- Continue adding these 'watercolour style' dots
- Thin where the lighter drops are. Try to overlap them or do imperfect dots so they add dimension and shading
- Using brown acrylic paint and brush, roughly paint branches
- Thin down white acrylic paint with water and add highlight to the branches. Do it the same way as the dots - paint it on watery and then soak in the excess water
- Using black acrylic paint and thin detailing brush, outline the branches and add few more black lines to add dimension
- and connect the berries to the branches. Paint few empty stems without berries
- Topcoat the nails. I have used OPI Matte Topcoat but if you want the artwork to last the longest possible time then use regular topcoat first and then matte topcoat
This is the original artwork that inspired these nails:
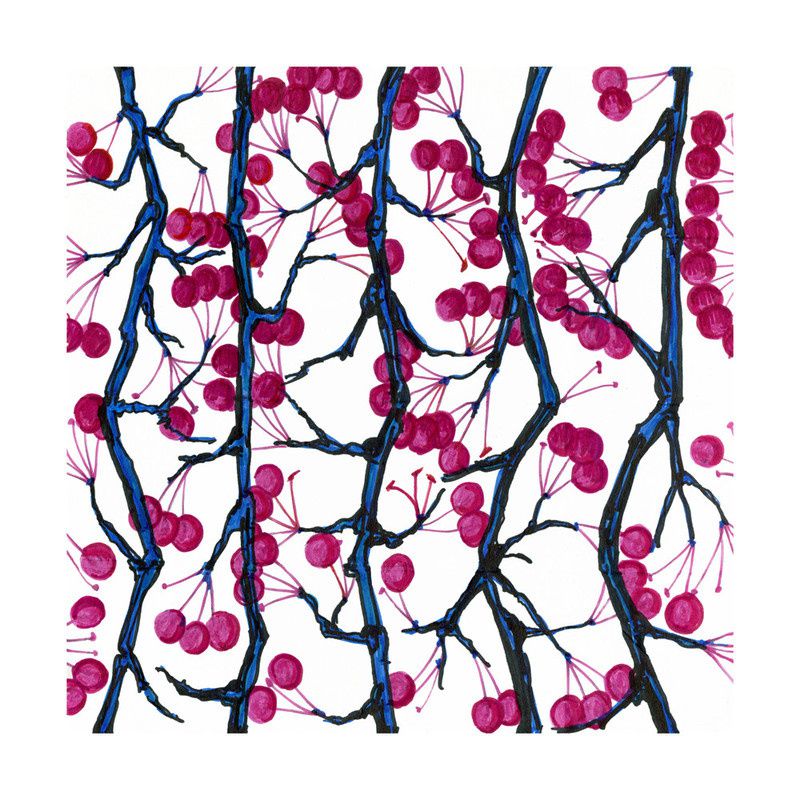
DAZZLE BERRY limited edition print by Me Amelia; picture used with permission from minted.com
I can't wait to recreate more artworks from that site, there are so many beautiful pieces! I've spent hours at their site just browsing and THEN I've noticed they do wedding stationery too! Oh my goodness I've seen so many beautiful designs and have spent couple more hours browsing them. What a wonderful site! If you would like to get inspired too and browse their Art Marketplace and latest art, the address is www.minted.com/art ;) Apart from art prints and wedding stationery you can find there Christmas cards, photo cards, map presents (which are super cool!), party decor and more.
It feels so good to do such cool art and post again! I truly hope you've enjoyed it and if so then let me know your thoughts in the comments.
/image%2F0703241%2F20201222%2Fob_7b3a98_semilac-my-love-gel-polish-nails-4.jpg) My Snowflake Nails for Christmas 2020 with Semilac...
My Snowflake Nails for Christmas 2020 with Semilac.../image%2F0703241%2F20200814%2Fob_22ce10_lart-supreme-kit-29-2.jpg) REVIEW: LART Supreme Mineral Powder Dipping System...
REVIEW: LART Supreme Mineral Powder Dipping System.../image%2F0703241%2F20170429%2Fob_799087_gilded-marbled-amethyst-nails-6.jpg) Dress your nails to impress with this marbled amethyst...
Dress your nails to impress with this marbled amethyst.../image%2F0703241%2F20170727%2Fob_3240b9_pink-gold-dry-brush-nail-art-4.jpg) The Manicure That (I) Rocked The Scratch Stars Awards...
The Manicure That (I) Rocked The Scratch Stars Awards...

/image%2F0703241%2F20141109%2Fob_c6033c_cartoon-blocks-nails-with-spell-polish.jpg) Cartoon Colour Block Nails with Spell Polish
Cartoon Colour Block Nails with Spell Polish/image%2F0703241%2F20141015%2Fob_2e0a8e_spell-polish-smile-transference-5.jpg) Spell Polish - Smile Transference | Review & Swatches
Spell Polish - Smile Transference | Review & Swatches