Halloween Glow-in-the-dark Pumpkin Face Nail Art + TUTORIAL
Hello lovelies,
I'm back with the promised Halloween nails! My goal was to do (now classic) pumpkin faces that have been done hundred times already but I added something extra - Morgan Taylor Glow in the Dark polish. So now I'm walking around with scary pumpkin faces on my nails and glowing nails at night. Don't you just LOVE nail art?!
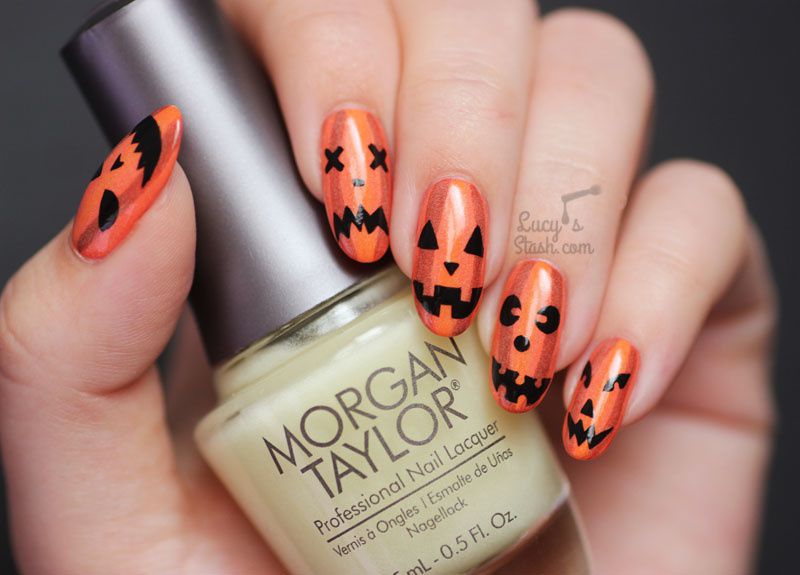
Here's how the final manicure looks:
The nails glow in the dark very nicely but my camera just refused to capture them so I ended up taking picture under UV light so that I could show you how they look at night. Awesome, right?
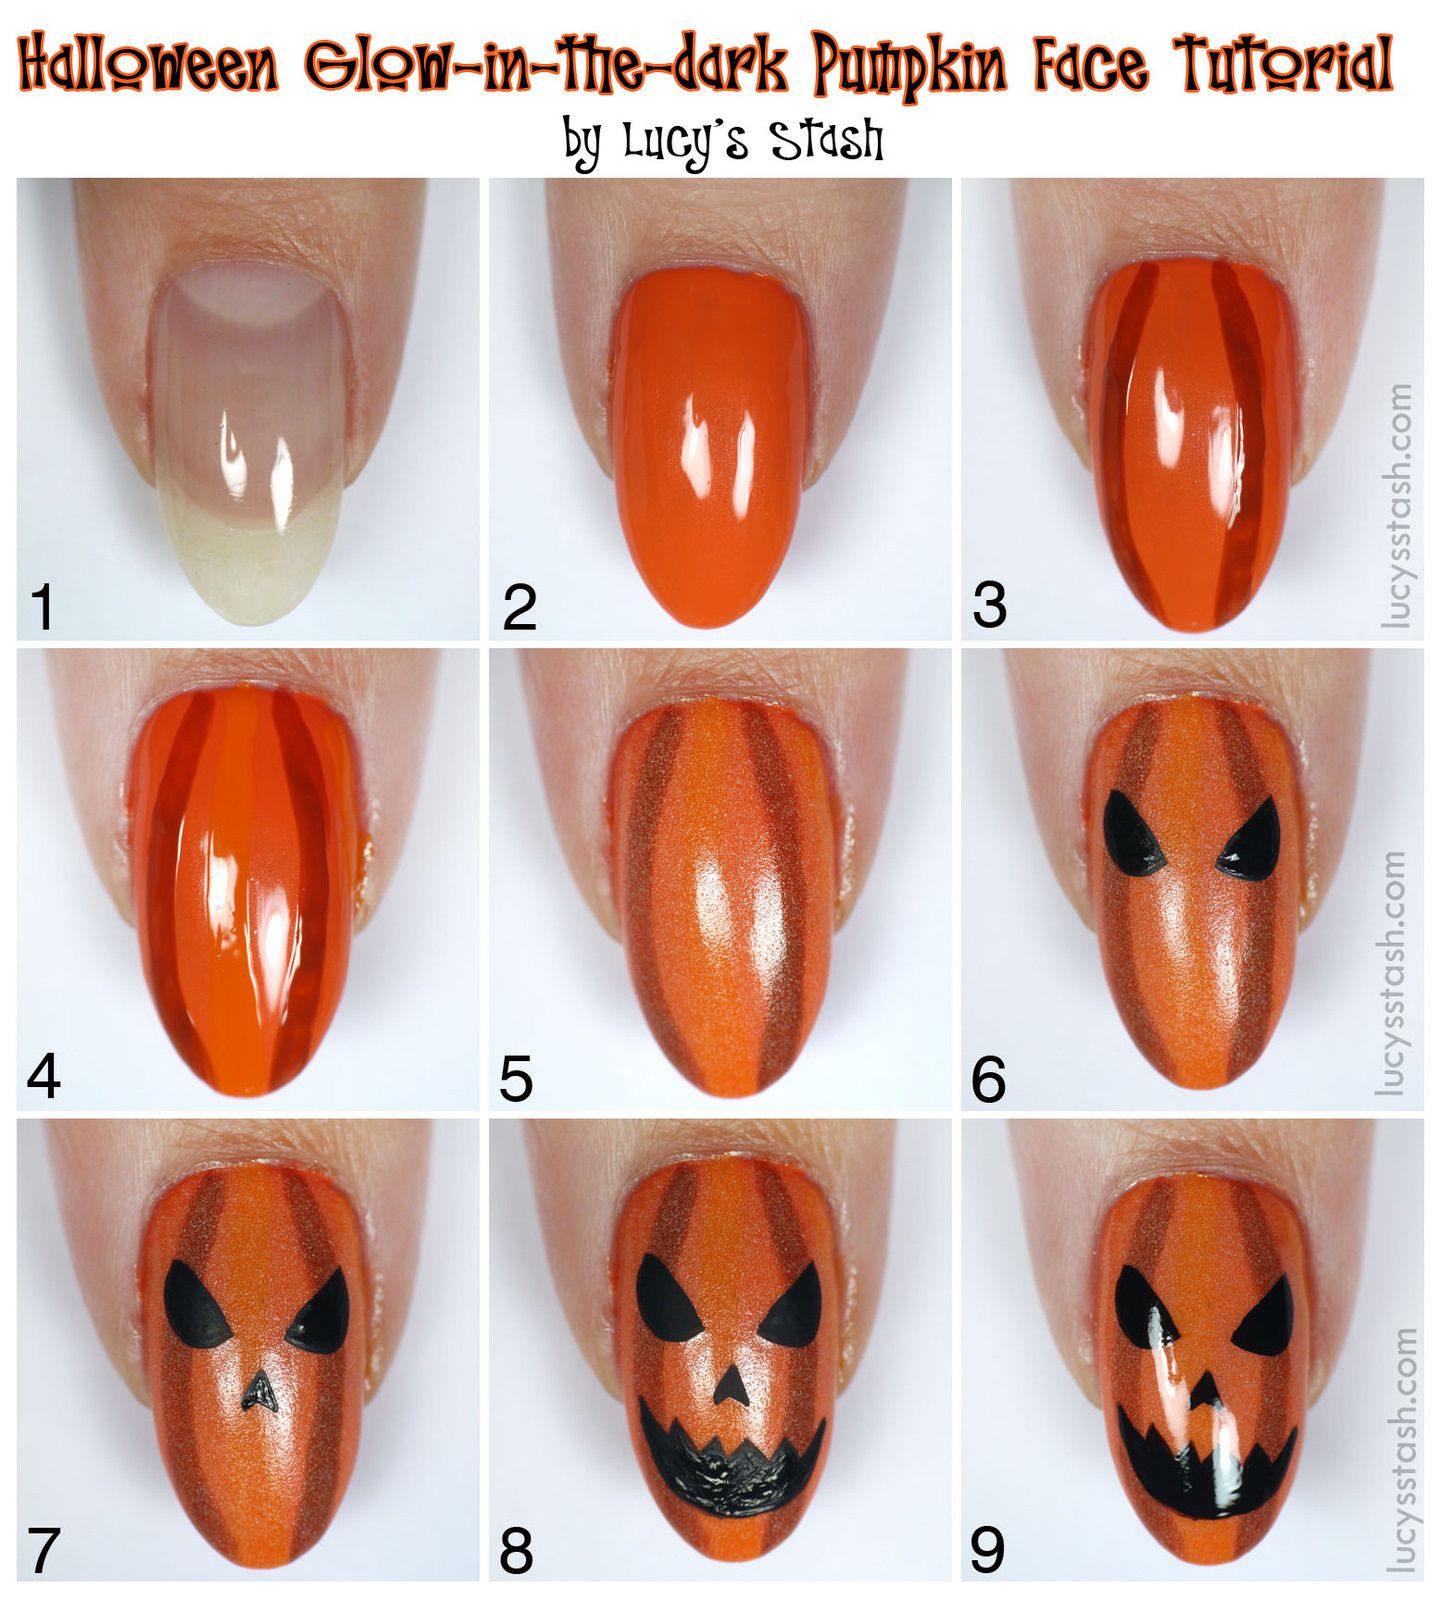
This look is an intermediate skill level but you can easily modify it so that it's suitable for beginners. Just don't do intricate pumpkin faces. Here's how to do this mani:
How to:
- Apply base coat. I've used UNT Ready For Takeoff peel off base coat for this one otherwise my go-to base coat is OPI Natural Nail base coat
- Paint the nails with two coats of orange nail polish. Here I'm using Zoya Thandie
- Paint to curved stripes using darker orange/orange brown polish and nail art brush. The stripes don't have to be perfect, you'll see why, later. I've used Barry M Paprika and Whats Up Nails Pure Color #9 Liner brush*
- Paint another stripe in between the darker stripes with lighter orange colour. I've used Barry M Mango
- Now it's time to add the glow-in-the-dark polish. I've applied three coats of Morgan Taylor Glow in the Dark*. I went to check the level of glowing after each coat and I was happy after three. I suspect that if I applied the glow in the dark polish over white base it would be even brighter or I might need just two coats. But the three coats were just fine and it covered and blended any imperfections in the stripes
- Paint the eyes of the pumpkin with black nail polish or acrylic paint. I've used acrylic paint because it gives me more control and precision. The brush I'm using for painting the pumpkin faces is Whats Up Nails #10 Detail brush*
- Paint the nose
- Paint the mouth and don't forget that you need to think about where the black space will be so that you leave out any 'carved out' teeth ;)
- Seal the design with top coat. I've used Revlon Colorstay Diamond top coat
So that's my take on the pumpkin faces nails! I'm not big on Halloween and gory looks so I'm pleased I got myself to do at least two looks this season. I took an inspiration from different cartoon pumpkins that just came up on Google and combined different elements for their faces. What do you think?
I've noticed that Natasha Lee has filmed a similar pumpkin face nail art tutorial so if you'd like to see a video and more Halloween nail art, go check out her channel, she's awesome!
Have a lovely day! Lucie x
*PR sample
/image%2F0703241%2F20140120%2Fob_b8b3b5_blog-header-new2.jpg)


/image%2F0703241%2F20201222%2Fob_7b3a98_semilac-my-love-gel-polish-nails-4.jpg) My Snowflake Nails for Christmas 2020 with Semilac...
My Snowflake Nails for Christmas 2020 with Semilac.../image%2F0703241%2F20200814%2Fob_22ce10_lart-supreme-kit-29-2.jpg) REVIEW: LART Supreme Mineral Powder Dipping System...
REVIEW: LART Supreme Mineral Powder Dipping System.../image%2F0703241%2F20170429%2Fob_799087_gilded-marbled-amethyst-nails-6.jpg) Dress your nails to impress with this marbled amethyst...
Dress your nails to impress with this marbled amethyst.../image%2F0703241%2F20170727%2Fob_3240b9_pink-gold-dry-brush-nail-art-4.jpg) The Manicure That (I) Rocked The Scratch Stars Awards...
The Manicure That (I) Rocked The Scratch Stars Awards...