/image%2F0703241%2F20140120%2Fob_b8b3b5_blog-header-new2.jpg "nail art - reviews - swatches - nail tutorials")
Hello lovelies,
I have a last design that I've prepared for Halloween and despite posting it a bit late I think you still might enjoy it ;)
Here I've opted for a dark, vampy base with stamped spider and nets. It's a simple look to create and it's not too extravagant. Let's have a look at the final design and how to recreate it!


How to create this look:
Step 1 - start with clean and dry nails and apply a coat of your favourite base coat. I'm using OPI Natural Nail base coat.
Step 2 - paint the nails with two coats of A England In Robe And Crown and let dry for few minutes.
Step 3 - stamp the spiders in the middle of the nail and spider web in a half-moon style. I've used Pueen Halloween Party 01* stamping plate, A England Excalibur RENAISSANCE and Pueen HD Chunky clear stamper*. The clear stamper really helps with an accurate placement of the stamp.
Step 4 - seal the design with your favourite top coat. In this case I've used Revon Gel Envy Diamond top coat.

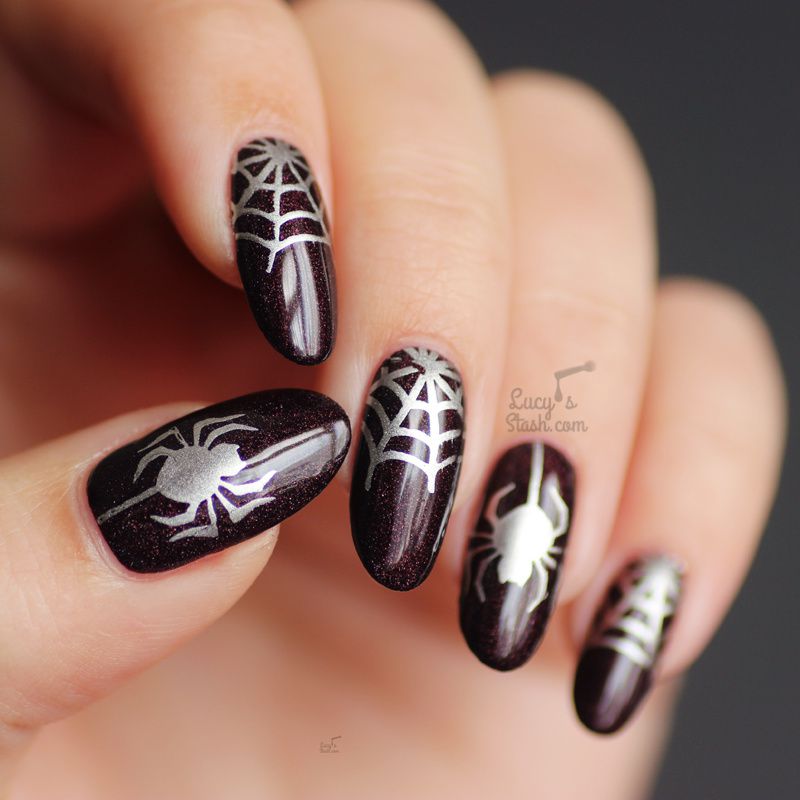
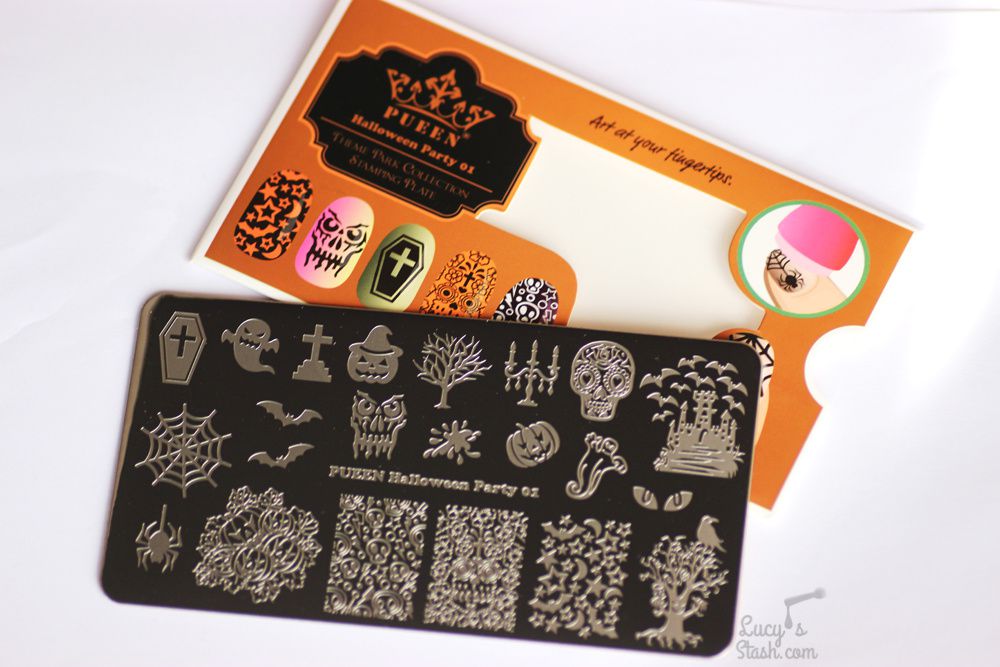
Pueen has sent me this Halloween Party 01* stamping plate full of Halloween designs. Some cover full nail, some only a portion so it has a good selection. I love the simplicity of just having the spider web half moons and spider accent nails and also how gorgeous is the subtle holo effect that peaks out of that sexy vampy polish?! I loved wearing these nails so much! What do you think?
Have a lovely day! Lucie x
*PR sample
/image%2F0703241%2F20201222%2Fob_7b3a98_semilac-my-love-gel-polish-nails-4.jpg) My Snowflake Nails for Christmas 2020 with Semilac...
My Snowflake Nails for Christmas 2020 with Semilac.../image%2F0703241%2F20200814%2Fob_22ce10_lart-supreme-kit-29-2.jpg) REVIEW: LART Supreme Mineral Powder Dipping System...
REVIEW: LART Supreme Mineral Powder Dipping System.../image%2F0703241%2F20170429%2Fob_799087_gilded-marbled-amethyst-nails-6.jpg) Dress your nails to impress with this marbled amethyst...
Dress your nails to impress with this marbled amethyst.../image%2F0703241%2F20170727%2Fob_3240b9_pink-gold-dry-brush-nail-art-4.jpg) The Manicure That (I) Rocked The Scratch Stars Awards...
The Manicure That (I) Rocked The Scratch Stars Awards...